Taking backups of sites is almost an everyday task for bloggers and webmasters. You don’t know when your site will face security threat. It may crash anytime, due to hacks, server issues, or any other problems. And having a complete backup of your site, including files, databases will save you from losing years of hard work you’ve put into your site.
 What if I told you that you can create a complete backup of your site for free?
In this article, I’ll show you both way – how to take a backup of your site manually using FTP and using a plugin called BackWPup. After that, I’ll also show you how to restore blog with the backup.
Recommended Reading: Migrate from Blogger to WordPress without Losing Traffic
How to backup WordPress blog and reinstall blog from backup?
Before I show you the step-by-step guide to backing up WordPress blog and restoring it again, let me show you how my blog looks like before I touch on it.

This is the look of my blog as of now.
Before you take a backup of the files, you also need to backup your database and XML file. So, I’ll first show you these two and then move onto the file backups later in the article.
How to backup database manually?
 Log in to cPanel. Scroll down to DataBases, click on “phpMyAdmin”.
 Select the database you want to backup. I have blurred out my database name for security reasons, but you can see your database name there as shown in the screenshot above.
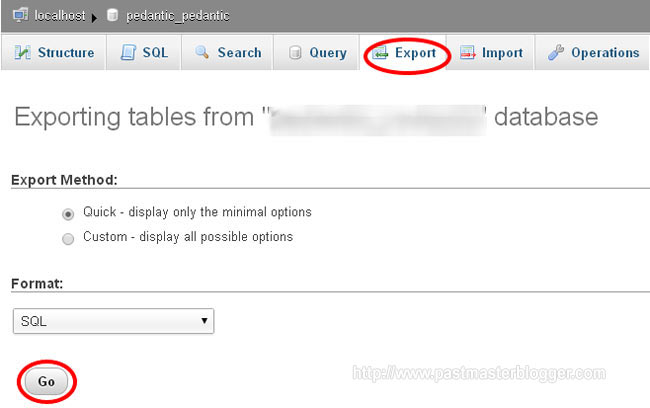 Now, click “Export” and select the format you want to export in, preferably SQL format and next click “Go”.
A file with your database name as the file name with .sql extension will be downloaded to your computer. Browse to the folder where it has been downloaded and keep it safe, as you will need it later when restoring the blog again.
Now, you can log out of cPanel.
How to backup for XML file?
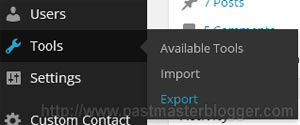 Log in to your WP Admin Dashboard. Go to Tools in the left navigation and click on “Export”.
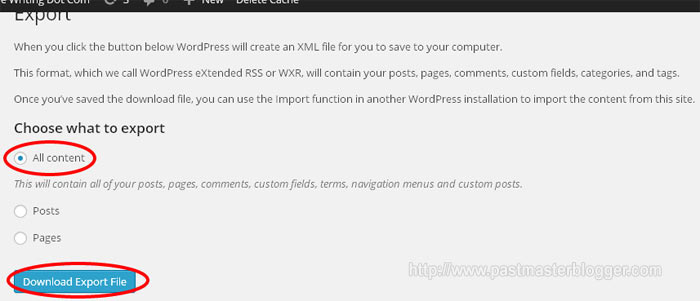 Select “All Content” and then “Download Export File”.
An XML file is downloaded into your computer. Save it in a folder properly.
So, you’re ready with the database and XML file. Now I’ll show you one by one both the methods – first using a plugin called BackWPup to create a backup of your blog, and second doing it manually using FTP.
Please note that if you use BackWPup, you can avoid following the above two steps depending upon the configuration you set up for the plugin after installing it.
How to Create Backup using BackWPUp Plugin?
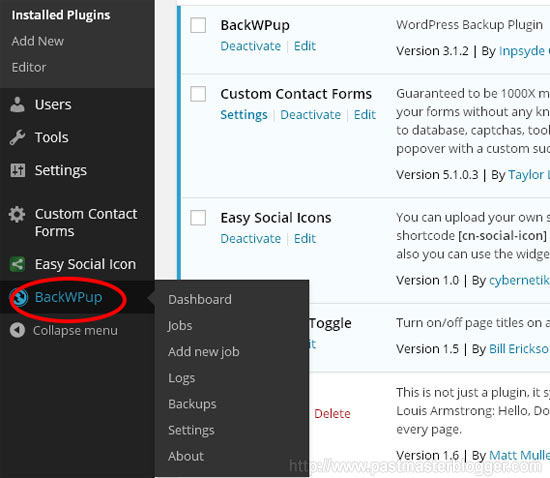 Install and activate BackWPup plugin in your blog. Upon activation, you will see a welcome page.
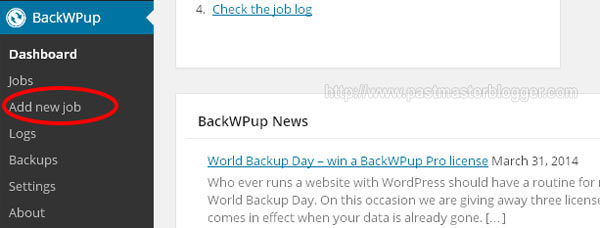 Now, you need to set up a task for allowing the plugin to take backups of your blog automatically. Click on “Add New Job” to create automated backup jobs.
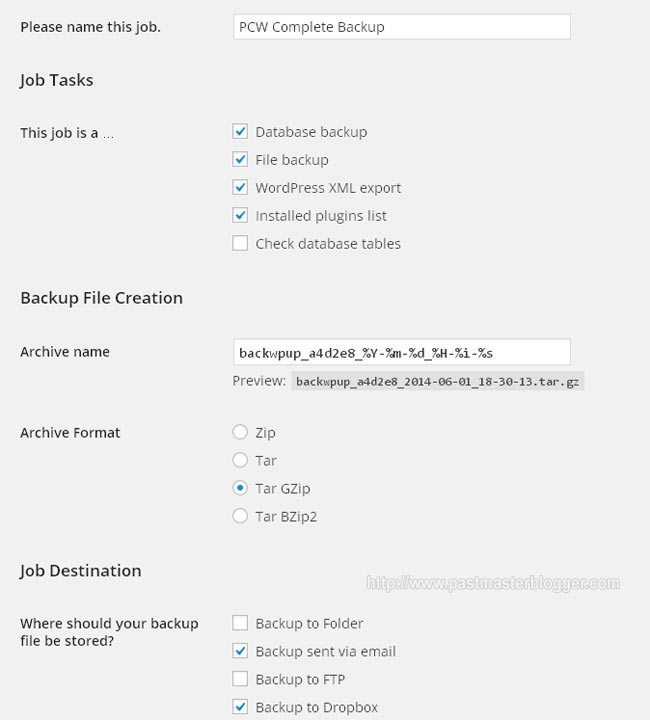 Now, here you have to do the settings for the type of backup you want to take. Under the General Tab, first you need to give a name to this job. For example, as you can see above, I have named this “PCW Complete Backup”, since I want this particular job to take a complete backup of my blog.
Now, I will check the tasks that I want to plugin to conduct. Here I have selected Database Backup, File Backup, WordPress XML Export, Installed Plugins List because I want the plugin to automate the full thing without having to put my hand into it. So, the database will be backed up, the XML file will be backed up, the files will be backed up and also a list of plugins I am using on the blog will be backed up, if I ever forget about the plugins I had installed here.
Next, choose an archive format you want the files to be downloaded in. By default, it’s Tar GZip, but you can choose Zip format, if you feel.
Now, below that, select the destination where you want your files stored. Here I have chosen dropbox as the destination where I want my files saved. Sometimes, due to security issues, I don’t prefer DropBox, but I prefer files sent via email. However, it is not recommended to backup to a folder in your server, because it causes in increased disk space usage unnecessarily. Finally, save all the changes you made.
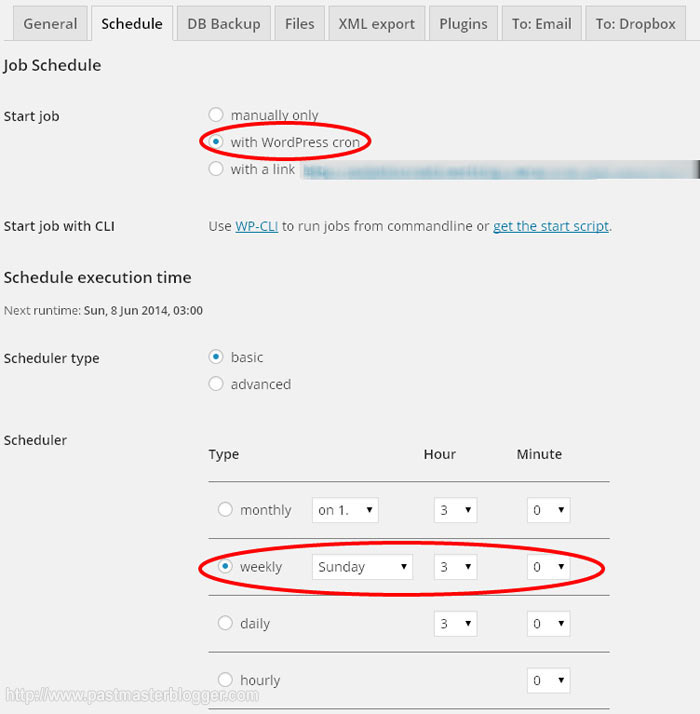 Next, under the “Schedule” Tab, you can choose how often you want to backup your blog. You can choose to do it manually as per your need or run a cron job to do it weekly, monthly, or daily automatically for you. For beginners, it is recommended to schedule weekly backups. For example, in the screenshot above, I have chosen to perform the backup every Sunday at 3 hours, means 3 am.
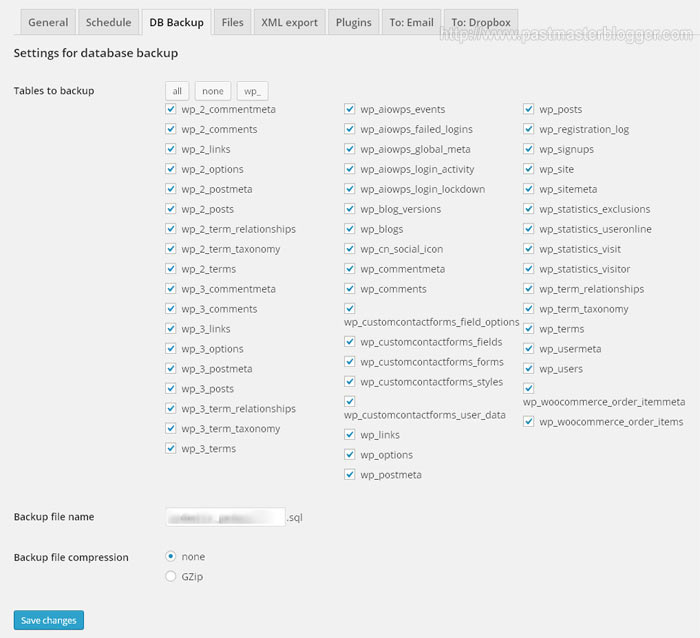 Next, hop to the “DB Backup” tab and select the database tables you want to backup. Sometimes, WordPress plugins create tables into your database and these tables might not be important. So, unchecking these tables might reduce the backup size. However, if you are unsure of what you are doing, then keep all tables checked.
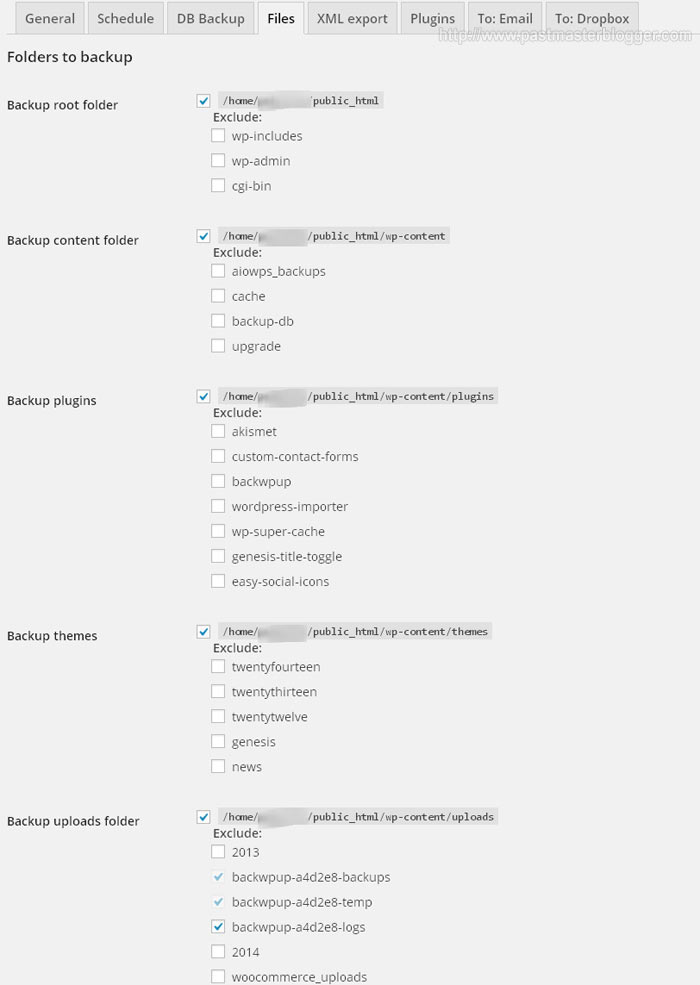 Under the “Files” tab, you can check the files you want to backup. Since I am attempting to take complete backup in this article, I will check all the files, including the WordPress core files. I have checked all but excluded only the BackWPup temp and logs files from the Backup Uploads Folder. In the “Exclude files/folders from backups, I have given these extensions .tmp,.svn,.git,desktop.ini,.DS_Store because I don’t want to backup these files. I have also checked the Include Special Files, as I want to backup everything from wp-config, robots.txt, .htaccess, .htpasswd, favicon.ico from root.
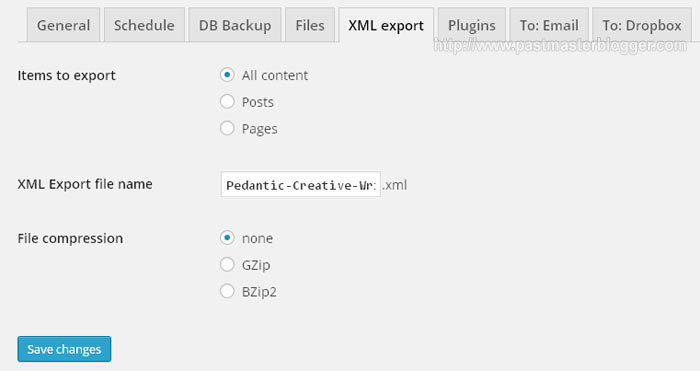 To export the XML automatically, click on “XML Export” and select “All content”, write a name of the file you want to export your XML file and select an extension you want to download in. I prefer keeping it to none, as I want the file to be downloaded as XML file only.
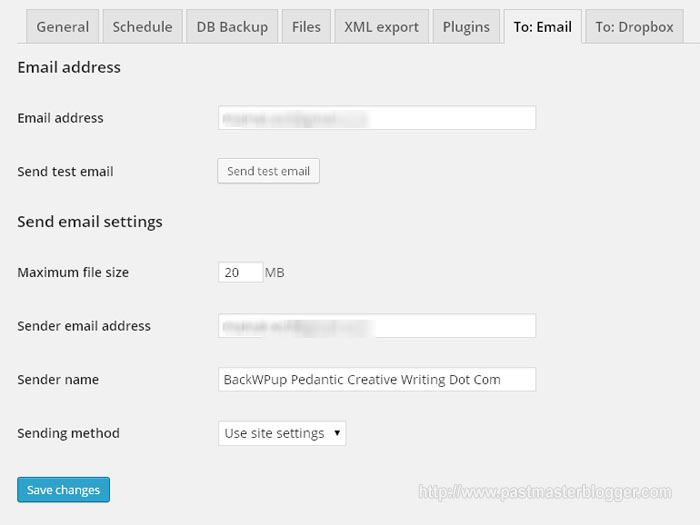 Since I have selected Email as one of the ways to backup files, go to “Email” and type the email address you want the plugin to send you the backup. Put 0 if your email server allows you unlimited storage, or put the value that you can max receive. Make sure that the value is more than the size of the files you will backup, otherwise you will receive error message.
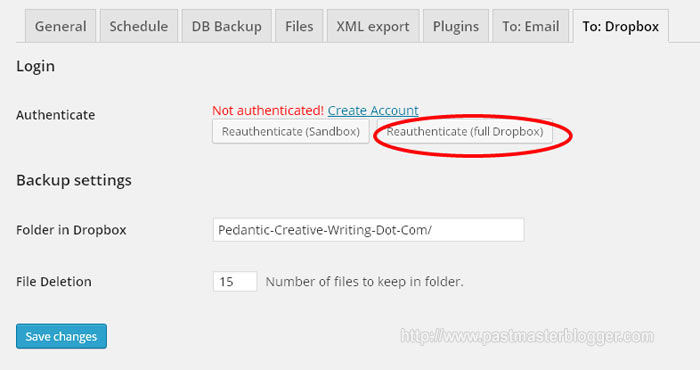 If you want to use DropBox to store your backups, you have to authenticate the app and allow it access to your DropBox.
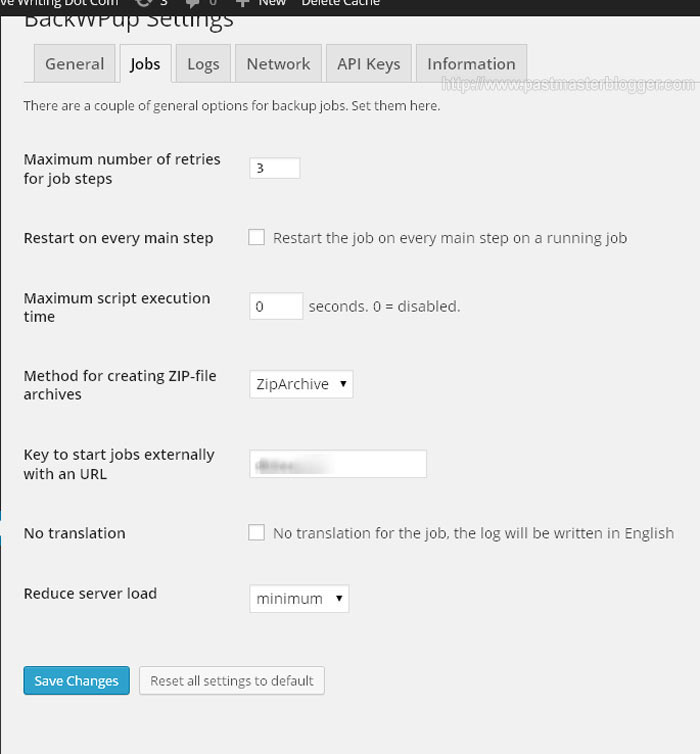 Let me tell you that when taking automatic backups, sometimes there might be server overloads and the plugin may have to undergo several retries. So, go to BackWPup > Settings > Jobs and increase the Maximum number of retries for job steps from 3 to 5 and select the “Reduce Server Load” to minimum.
That’s all, the plugin will start backing up your files, folders, databases at the given schedules.
You’re worry-free! No hassles of losing all your hard work because you know you have backup of your blog.
You can create multiple jobs likewise separately for backup of database only every day or backup of all files once a month, according to your requirement.
How to backup your blog manually using FTP?
To take up using FTP, you need FTP clients like FileZilla or CoreFTP. These are open-source software, so you can download them here and here respectively for free. I will use FileZilla to explain this article.
I am assuming you have FileZilla already downloaded and installed on your computer.
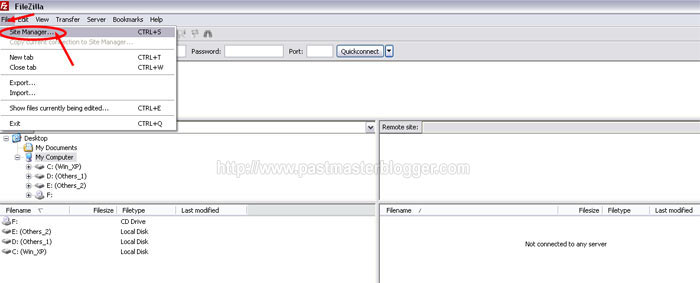 Double click on FileZilla to open it. Go to File > Site Manager. Put your Host name. It will be like ftp.yourdomainname.com (replace yourdomainname with Your own Domain Name), Logon Type: Normal, User is the username of your cPanel and Password is the password of your cPanel. Next, click “Connect”
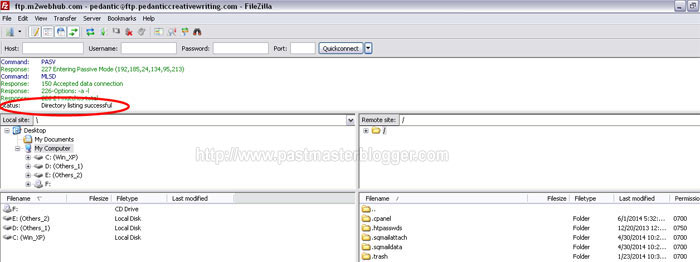 See it shows “Directory Listing Successful” upon successful connection with your server.
Now, create a folder on your desktop where you want to backup your files and folders. For example, in this article, I have created a folder named “Backup of PCW” – this is the folder where I will store my backup.
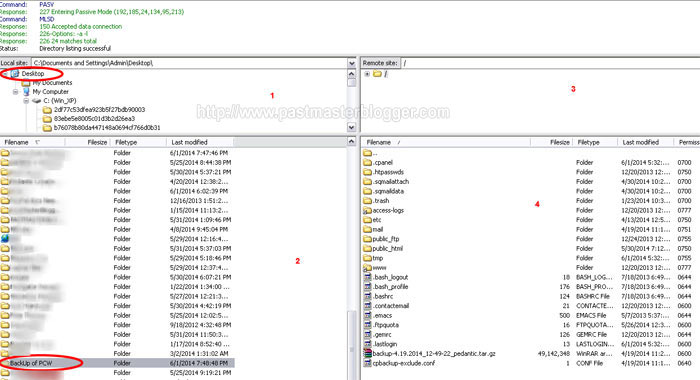 Now, from the Quadrant 1 as shown in the screenshot, select Desktop and you will get to see in Quadrant 2 all the files and folders that are in your Desktop. From the image above, you can see that the folder “Backup of PCW” I just created in the above step is there.
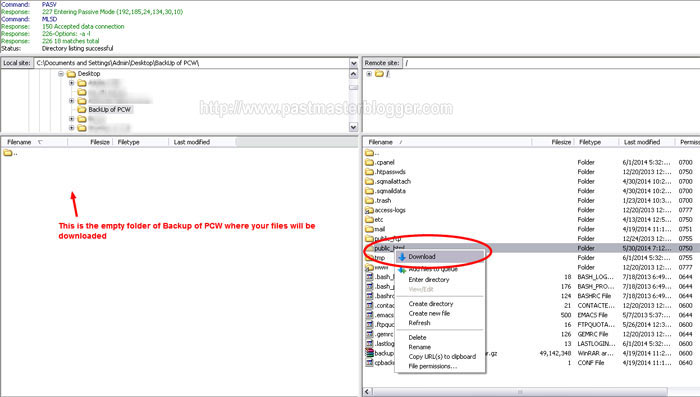 Now, double click on that folder to navigate into it. You will find the folder empty. This is where all backup files will be stored in the next step. Now, go to Quadrant 4 (the server side) and right-click on the folder public_html to download it.
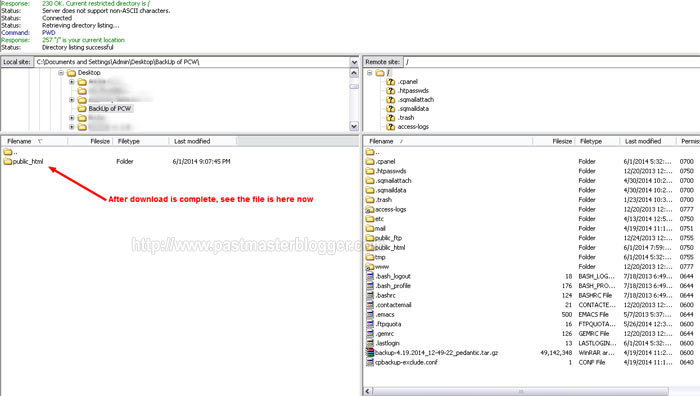 Depending upon the speed of your internet and the size of the files, it takes some time to download. After the download is complete, you will see the files in the folder you created.
How to restore the backup of your blog?
Since I have taken a full backup of my blog, now I will delete my blog and the database and show you how to re-install the blog again from this backup.
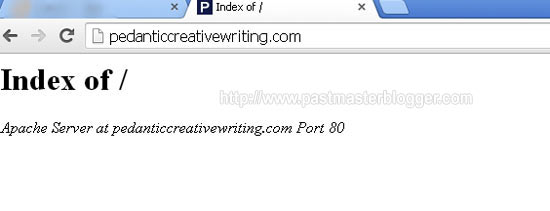 Now, as you can see from the screenshot above that now there no blog exists at pedanticcreativewriting.com. It’s empty.
Now, I will re-install the blog again using the backups I have just taken in the above steps.
 Before I upload the files, I need to create the database. So, I login to cPanel again, scroll down to Databases and select MySQL Databases.
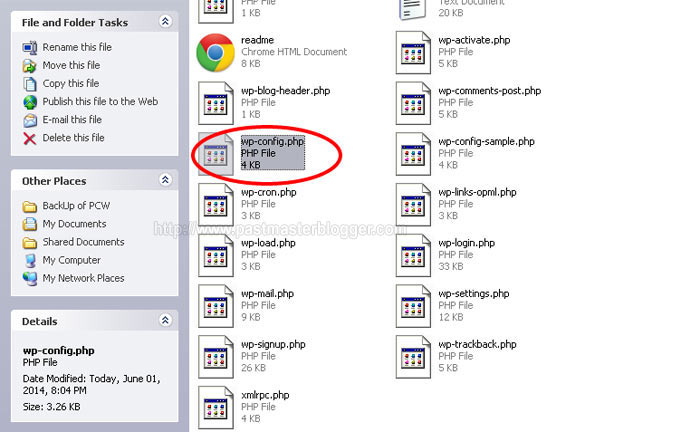 You need to know the database name, database user and password of your previously created database. So, browse to the folder where you had backed up the files and find the file wp-config.php”.
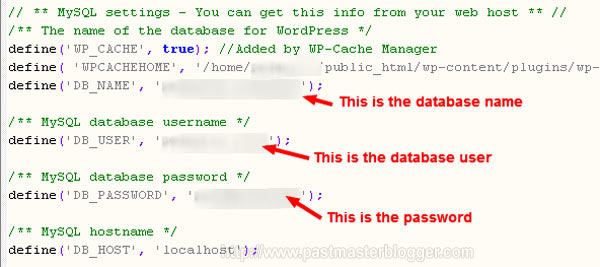 Open it with Dreamweaver or Notepad++ and find ‘DB_Name’, DB_USER’ and ‘DB_PASSWORD’ as shown in the image. Copy these and save them in a Notepad file safely because you will need them in the next step. I have blurred the image for security reasons.
 Now, after you have selected MySQL Databases in the cPanel, you will be directed to this page. Input the Database name here (the one that you copied and stored in a Notepad file in the previous step), the portion after the underscore.
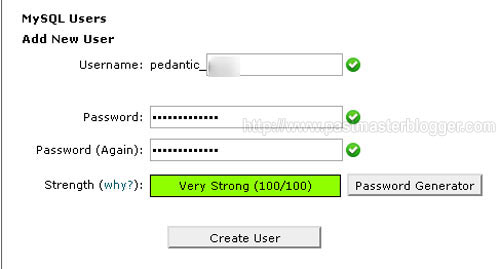 After you have created the database, you have to assign a user to the database. So, create a user as shown in the image above. Make sure the user has the same name as the one you copied in the Notepad file. Also, give the password. The password must also match the previous password that you copied from wp-config.php file to your Notepad file. After that, click “Add User”.
 Now, you have to “Add User to the Database”. So, select the Database Name and the corresponding User and click Add. In the next page, select “All Privileges” and “Make Changes”.
So, with this, you’re done with creating the database and assigning an user to this database.
Now, I’ll upload the backup files via FTP.
Open FileZilla once again, connect to your account by going to File > Site Manager and putting the Host Name, User and Password.
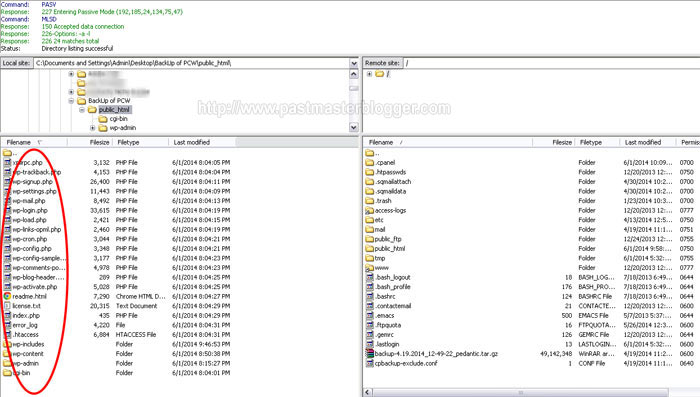 Once connected, browse to the folder where your backups are in and open the folder. As you can see in the screenshot above, all the files and folders exist in the public_html folder. So, I will keep that folder open with all files.
Next, on the server side, double click on public_html to open the folder because this is where you are going to upload all your files.
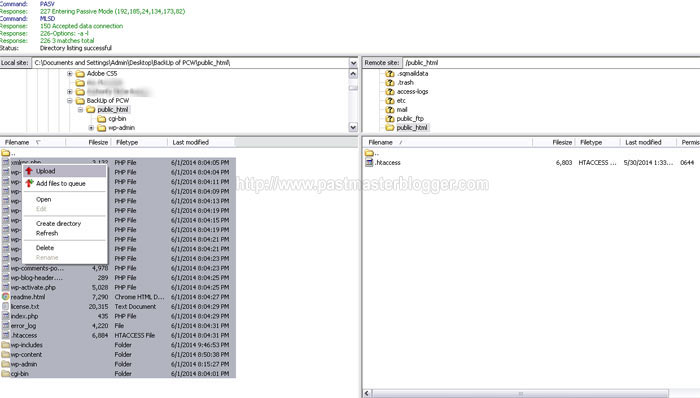 Now, click CTRL + A to select all the files, right click and then select “Upload”.
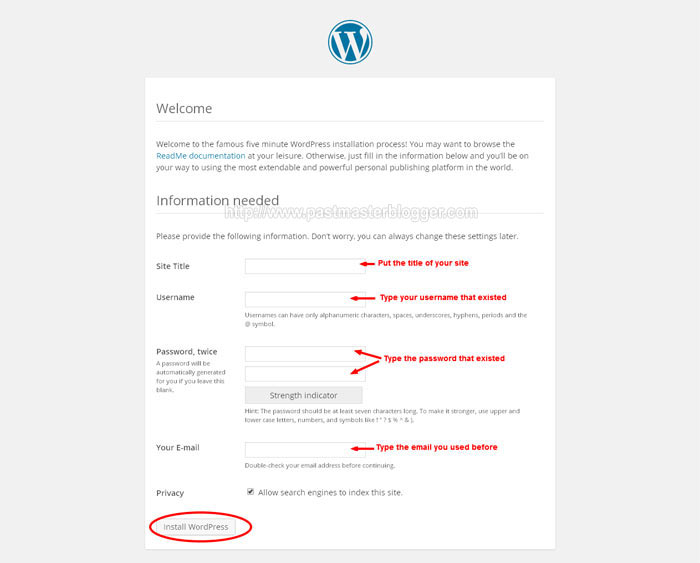 After all files are uploaded, go back to your browser and type your domain name. A Welcome page will open up asking you to install WordPress. Type the site title, give your username and password and finally click Install WordPress.
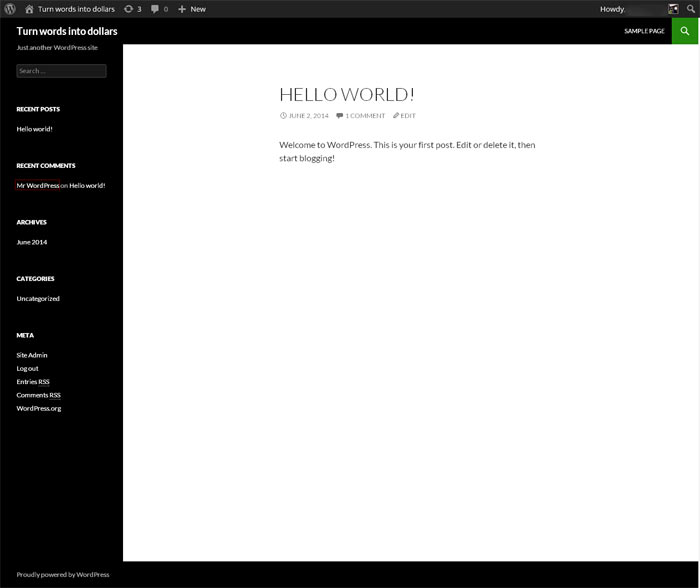 You will be asked to log in. Log in to your Dashboard now and visit your site front end. It looks empty as you can see in the image above.
Navigate to Appearance and activate the on the site previously installed.
I have not yet imported the database, which contains all the content. That’s why it looks like that. I will do that in the next step to get back the old look of my blog.
 Now, log in to cPanel again, scroll down to Databases once again and click “phpMyAdmin”.
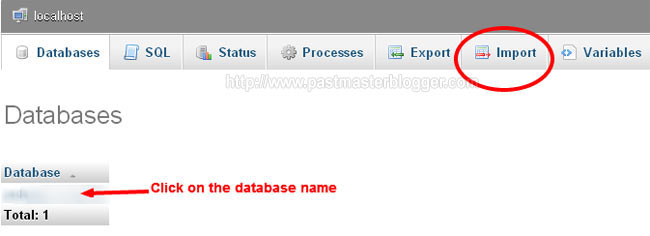 Here select the database name you created. Next, click on Import tab.
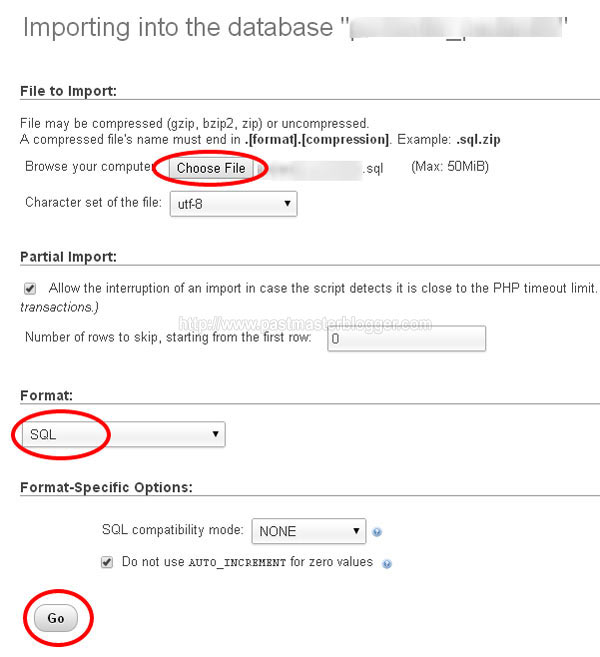 From the “Browse your Computer, browse the SQL file that you saved right in the beginning from the Desktop. Under Format, choose the format you saved in. Here I saved in SQL format, that’s why I kept to SQL and then hit the “Go” button.
Go to Tools > Import > WordPress > Choose File > Browse the XML file from your desktop > Upload File and Import > Import Author and assign posts to the existing author > Check the box Download and Import File Attachments > Submit.
Now, activate the plugins installed and place the widgets where they were. Also, go to Settings > Permalinks and adjust the permalinks according to the previous settings. In some themes, the widgets get placed automatically. But if you are on Genesis, you need to place the widgets again to their respective places to design up the homepage.
 That’s done, here you can see my blog again in the same way it started.
Conclusion
So, how do you feel? Was it easy or darn hard to backup your blog and then restore your blog again from the backup?
Recommended Reading: A Debate on Blogger and WordPress
You might face some issues but troubleshooting them and learning these basics all yourself is a must for all bloggers.
Do leave a comment and let me know how easy it was to backup your blog following the instructions and then re-installing it again. I would love hearing from you. Also, please share it with your other blogger friends so that they may also learn doing these basics themselves in the future.
HI Mainak,
I backup my blog manually but I don’t go to the phpMyAdmin area any longer. In my cPanel under files I just click on backups and then I backup my database file. I’ve had to restore it so I know this works beautifully.
I then go to my File Manager and my public_html folder and then compress my blog URL files. I do a full backup once a month but I back my blog up every single day.
I haven’t had to restore it myself, my hosting service has done that for me. I’ve had to do this twice now once with the server I was on was hacked and the second time is when I had just moved over to a new service and they accidentally deleted my entire database. Oops! Thank goodness I had the backups.
This is a long and confusing post but one that I hope everyone is at least doing. You never know when you’ll need those back ups for sure.
~Adrienne
Hi Adrienne,
Yes, of course taking backups of your blog is almost an everyday task for bloggers and many of them are even doing so. This post is dedicated to those who are new and aren’t yet performing this essential thing.
The hosting provider does in most cases, but I have seen myself some hosting provider does not offer the service and that is when we have to perform ourselves. So, why not all learn the basics instead of relying on the hosting provider?
Backups can be done via cPanel, plugins and other ways, so I made this post as thorough as possible, mentioning the FTP method and the plugin method. And I think it’s far more secure to do things via FTP (especially I love doing it myself) instead of directly from the cPanel. So, this article is just for those who wants to take backups and restore via FTP and a plugin.
Mainak.
Hey Mainak,
It can’t get anymore valuable than this. I love the illustrations on how to backup the different file formats and the how to restore them! I have a backup plugin on my blog but I’m also looking for others I can use. I’ve already had problems on my blog and it seems like this plugin is a bit more detailed as far as what files to back up. Thanks for sharing!
Hi Sherman,
Welcome to the blog!
Glad to know you that you found the article valuable, it’s so inspiring!
Yes, the BackWPup plugin really gives detailed options for taking backups and you can create multiple jobs according to your need. I’m using this personally till now and am really very satisfied for taking backups. Very easy to handle and works wonderfully without any faults.
Thanks for stopping by.
Mainak.
Hi Mainak
Indeed in this age of online uncertainty with regard to data security it is always safe to keep backup of your blog. If you blog is other than Blogger platform then its need multiplied because rest of the platforms are not as safer as the Blogger is.
You well pointed all the methods and means to make a back up manually and your are perfectly right once data of your blog rises to next level it is wise not to rely on hosting company and keep the data by yourself for maximum security. Whole exercise takes maximum 5 to 10 minutes that is not lengthy time to save our hard labor of several years.
Thanks for sharing this wonderful post-cum-tutorial on doing backups manually of WP blog.
Hi Mi Muba,
Welcome to the blog. So, nice to see you here
Well said, Blogger is indeed a very secure platform, given the fact that they are hosted on Google servers. I think as often we update our blog, we must at least backup our database once a week or every day if we update our blog three or more times a week.
And we can backup the WordPress core files every 15 days or every month – I think that’s enough! And of course, who would want to waste their years of hard work!
It’s so inspiring to know that you liked the post.
Thanks for stopping by and hope to visit your blog soon and get you know more.
Mainak.
We should back up our blog regularly because when unexpected things happen, like posts may be deleted and by mistake we delete our data in the blog, we should take back up of our blog. Your post is so helpful to new bloggers who are using wordpress, they can learn how to take backup of their blog and restore it. Thank you for your post .
Glad you found the post helpful @Harish
Hi Mainak,
it’s the first time that I am on your blog and I like how you present your content.
It is important to do regular backups of your blog, unfortunately a lot of people forget about it or solely rely on the backups done by their hosting providers.
Your guide on how to make backups can be easily followed even by newbies, so there’s no excuse for data loss anymore,.
Personally I am doing regular backups automatically of all content I have online. It is always better to be safe than sorry.
Cheers,
Torsten
Hi Torsten,
Welcome to the blog and I am glad to hear that you like the presentation of the content.
Newbies mostly forget taking backups, even I did so when I was a beginner but now, I do take backups regularly, especially of the database.
Thanks for stopping by friend and cheers to you with a virtual coffee.
Mainak.
Hello Mainak,
You have done a fantastic job for me. I asked Kulwant Nagi (CEO, BloggingCage) for this tutorial but he did not give me positive response. But now I am feeling relax because of this article.
~Diana Hardy
Hello Diana,
Yes, I remember your request and that’s why I wrote this article considering your request, especially for you and all my other readers like you.
I hope you have a trouble-free backup and restoration of your blog and let me know if you need further help.
Mainak.