 You’ve completed installing WordPress, so you’re thinking of installing the theme. But wait… there’s work to do before installing the theme. First, you’ve settings to configure after installing WordPress blog.
You’ll see a big “Welcome” message as you first login to your site.
WordPress is not SEO-friendly by default but a little configuration in the settings will make it SEO-friendly. Here’s a quick guide for newbie bloggers to get started and configure the settings of their WordPress blog.
Settings to configure after installing WordPress
Let’s begin by logging into WordPress admin of your blog.
If you’ve hosted your blog in the root directory, then your login URL will be:
www.wourdomainname.com/wp-admin
(Replace “yourdomainname.com” with your own domain)
If your blog is hosted on a sub-directory name, say “blog”, then your login URL will be:
www.yourdomainname.com/blog/wp-admin
Setting up the Permalinks
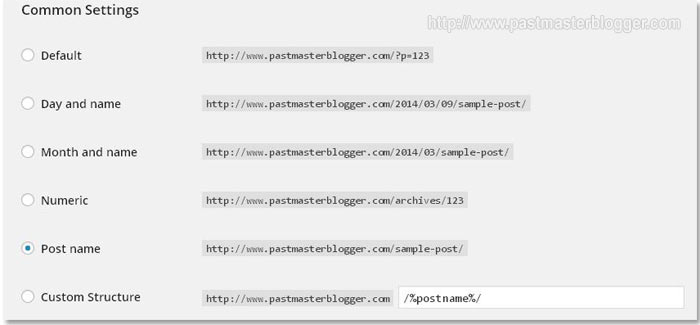 The first thing I’d recommend you to change immediately after logging in is the permalinks. The default WordPress permalink (so called URL) looks like http://www.yourdomainname.com/p=123. You can see this permalink is short denoting only the ID of the post but definitely not SEO-friendly.
At PastMasterBlogger, I use %postname% as my permalink settings, which shows the full post name in the URL. For example, the permalink of this post shows as www.pastmasterblogger.com/9-important-settings-configure-installing-wordpress. This way, the keywords show up in the URL, which makes it SEO friendly and easier to rank in the search engines.
Disable Membership (if you don’t want guest posting enabled)
 If you don’t want others to guest post on your blog, it’s safer to keep the membership option disabled, as this will avoid spam registrations. All you have to do is go to Settings > General > Uncheck the box “Membership”.
Set a New User Default Role
 I’d recommend you to set the New User Default role as subscriber if you have membership disabled. If any user subscribes to your blog, he or she will be set as a subscriber. In case you have guest posting enabled or in other words, membership option enabled, you can set the new user role to Contributor.
Set the Timezone
 Under Settings > General, set the timezone to your country’s time. This’ll ensure that your articles get published at your desired time.
Set the Date Format
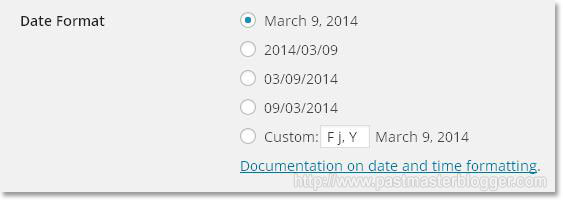 If you want to show date on your blog posts, set it to the desired format. At PastMasterBlogger, I’ve set the date format as March 6, 2014 as I feel it’s more understandable.
Create a Ping List
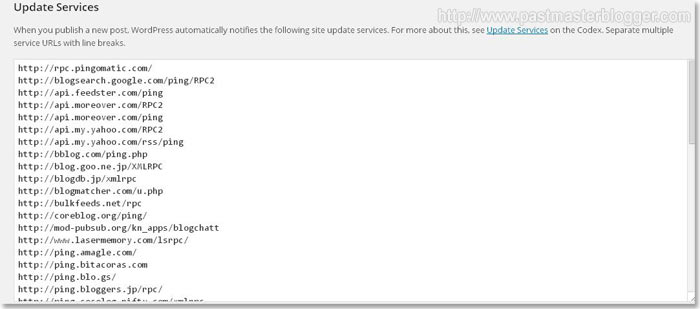 By default, WordPress sets the ping list to only one http://rpc.pingomatic.com/. Pinging a post after publishing helps in getting it indexed faster.
So, you can notify more services by adding more such names to the ping list. Go to Settings > Writing to add more services to ping.
Don’t change anything under Post via Plugin if you don’t know what exactly it is, as it might be risky.
Search Engine Settings
 Under Settings > Reading, uncheck the box “Discourage search engines from indexing this site”. This will help search engines discover your blog.
Enable Threaded Comment
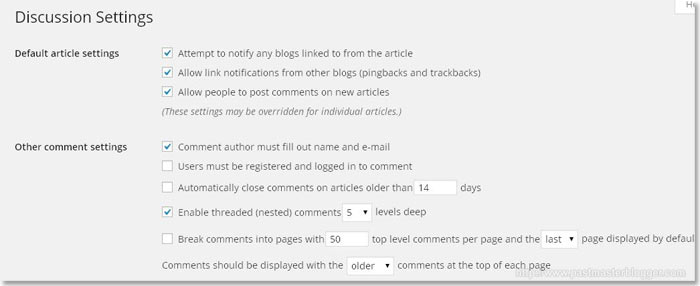 Under Settings > Discussion, enable threaded comments and select how many levels deep you want to show up. Make sure to uncheck the box where it tells you to break comments into pages. This is to avoid any duplication issues.
For example, in PastMasterBlogger, I have not broken down comments into several pages. If I’d have done so with this post that you’re reading now, then the page URLs would show up as www.pastmasterblogger.com/9-important-settings-configure-installing-wordpress/1/, www.pastmasterblogger.com/9-important-settings-configure-installing-wordpress/2/, www.pastmasterblogger.com/9-important-settings-configure-installing-wordpress/3/ and so on depending on the number of pages the comments show up. So, the same content would show up from different URL extending as 1, 2, 3… This is bad in terms of SEO. You’ll face duplicate content issues.
Set Avatars
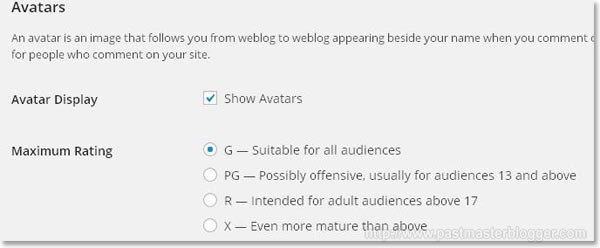 Avatars are an important part because it helps you identify with those commenting on your blog. For example, if someone comments on your blog and he or she has a Gravatar account, his or her image will show up in the comments section.
Select the avatar you want to show up in the comments sections for those who don’t yet have a Gravatar account.
If this is the first time you’re installing WordPress, you can keep this handy guide and configure the basic WordPress settings up 10 minutes. You can also bookmark this post for future reference.
When configuring, if you come across any settings that you feel important, feel free to comment it here and I’ll include it in my list.
Thanks for this post. I wish I had it as a guide before setting up my WordPress blogs. It’s really useful and I’ll bookmark it anyway. Someone else I know might need some tips one day. 🙂
Thanks for stopping by over at my blog and leaving a comment. I appreciate it. 🙂
Hi June,
Welcome to my blog! 🙂
I’m so glad to see you today. Wow, really! Setting up WordPress is really easy if you have the right guides in hand.
I’m so glad that others might need this tip some day. You made my day!! Thank you for coming by. I hope to get to know you more. Btw, I read your About Me page and I”d say you are a pretty interesting person. I hope to come and visit you soon. Have a nice evening…
Mainak
Making a permlink setting is really important because this will cause a big problem if you are going to change it later.
And thanks for sharing some other important changes I will made it surelly.
Changing permalinks later creates any broken links, that is why it is better to create SEO-friendly permalinks in the beginning.
hi..there. i installed wordpress application on plesk and i imported my wordpress blog. everything is fine but I cant enter into my general and permalink settings. i get error 500. pls rescue!