Installing WordPress on Hostgator is not as tough as many beginners think it to be. WordPress is a blogging platform that’s quite easy to use and getting a hosting account is the first step to install WordPress.
Now when it comes to selecting a hosting provider, it gets difficult to choose from the huge number of providers that already exist in the market. There’s huge competition in this hosting industry and everyone claims to provide the best service.
May be they do or doesn’t – that’s not what I am going to argue here. I’ve already tried out some of these hosting companies, and from my personal experience, I would recommend Hostgator.
I’d suggest you to read my review on Hostgator and take the decision yourself without being forced into it. You can also get a discounted Hostgator coupon and get a full 25% discount on your hosting bill.
Before I delve into further details, let me tell you that you can install WordPress in many ways. You can install it manually (which I usually do) or you can use this shortcut method using Fantastico which I’ll describe in this article.
How to Install WordPress on Hostgator in 5 Minutes
In this WordPress installing guide, I’ll use Fantastico to install WordPress on Hostgator. This is one of the easiest and fastest ways to install WordPress and it takes just 5 minutes to install the software.
Login to your cPanel using the details (username and password) send to you by Hostgator in your email.

Scroll down to the section “Services/Software” and click on “Quick Install” as shown above.
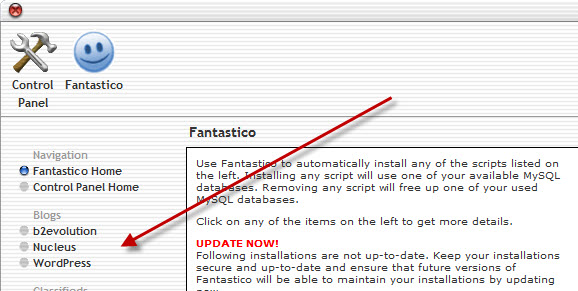
On the next page, click “WordPress” under the Blog Software category section on the left side.
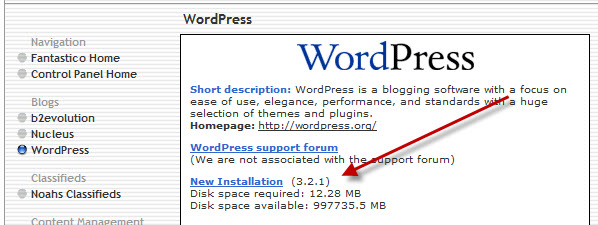
Click “New Installation” as shown above. Here you can see all the details about the version of the WordPress software being installed and the disk space of the software.
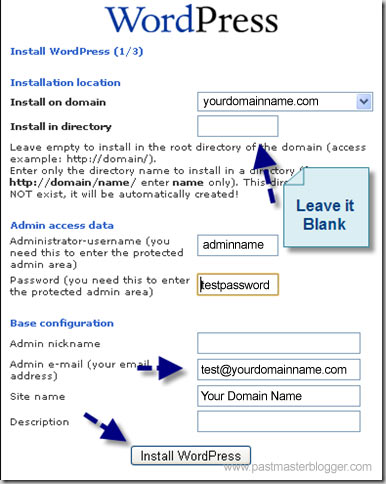
A new page will open up where you will have to fill up the details as shown in the image above.
Under the “Installation Location” part, select the domain from the dropdown box on which you want WordPress installed and specify the directory where you want it installed.
For example, if I want to install WordPress on www.mydomainname.com (that is I want my blog to run as www.mydomainname.com), then leave it blank. This means you are installing WordPress in the root directory.
On the other hand, if you want to install WordPress on a sub-directory, then enter the name of the sub-directory. For example, www.mydomainname.com/blog shows that it is installed in a sub-directory where the name of the sub-directory is “blog”. This means, you are installing WordPres on the sub-directory named “blog”.
Under the Admin access data part, give a strong username and password. This is the username and password you’ll be using to access your WordPress admin.
For the Base configuration part, give a properly working email. This is where WordPress will send you future emails for updates. Give your site a name and a small description. Site name and description is not mandatory, you can change them later.
Finally, click on “Install WordPress”. Before hitting the button, double check the data you’ve entered and keep a copy of the admin username and password for handy use.
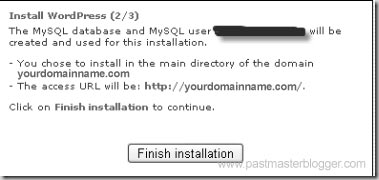
On the next page, you’ll get information about the database name and username automatically created during WordPress installation. Copy them and store in a safe place. You might need them in the future. Click on “Finish Installation” as shown above.
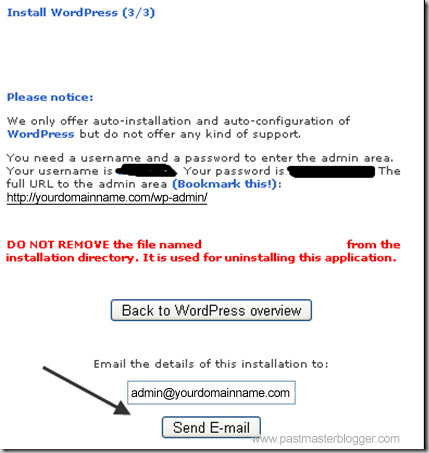
On the next page, you will see details of your WordPress admin username and password. In case, you hadn’t copied it earlier, copy it now and keep them safe. You can also click the “Send E-mail” button to send all the details of the installation to your email id as shown in the image above.
Now, your WordPress installation is complete. You can visit the admin page by adding wp-admin to the suffix of your domain name.
Now that you’ve completed the installation of WordPress on Hostgator, it’s time to configure your WordPress settings in order to start blogging.
In case you face any difficulties or issues in installing WordPress on Hostgator, feel free to let us know via comments. I’ll be glad to help you out. Also, feel free to check out my services where I offer free WordPress installation.
It is a great tutorial for a new blogger like me. after reading your post I feel it is damn easy install WordPress on Hostgator hosting. Thanks for the share.
Glad to know BhanuPriya that you found this tutorial helpful. 🙂 Installing WordPress on Hostgator is really easy. 🙂
Simple and Easy Steps to install WordPress on host gator Web Hosting.
This Complete Guide really helpful for newbies.
Thanks a lot
Thanks for commenting Riya and nice to hear that you found it helpful.