Last week, I was working on a website designing project for one of my clients and it was the first time I was working on Plesk. I had installed WordPress on cPanel several times but never worked on Plesk. That was the first time I got the opportunity to work on Plesk and learned how to install WordPress manually on Plesk Parallels.
 So, today I’ll share with you my experience and you’ll learn the step-by-step method to install WordPress on Plesk Parallels.
What are the things you need to keep handy to install WordPress manually on Plesk?
Before you install WordPress on Plesk Panel, you need to keep certain things ready.
Download the latest version of WordPress from its official page.
Creating Database on Plesk
 1. Log in to your Plesk Panel.
 2. Go to “Websites and Domains” tab as shown in the screen above and click “Databases”.
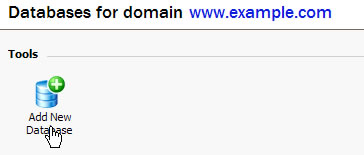
 3. On the next screen, click “Add New Database”.
 4. On the next screen, type the name for your database, set the type to MySQL and click “OK”.
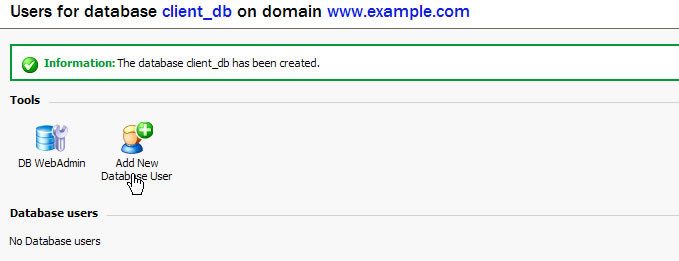
 5. Next, you need to add a user to the database. Click the “Add New Database User” icon.
 6. On the next screen, type the name of the database user, enter a complex password (make sure to note it for future use) and click OK.
Now the database is created, it’s time to start the installation process.
Step-By-Step Instructions on How to Install WordPress Manually on Plesk
![]() Go to Websites and Domains again and click on the icon as shown in the screenshot above to view the files of the domain.
Go to Websites and Domains again and click on the icon as shown in the screenshot above to view the files of the domain.
Please note: You will be uploading the files and folder of WordPress to the httpdocs folder.
You will find some default files and files with the httpdocs folder if this is your first time WordPress installation. Delete those default files and folders.
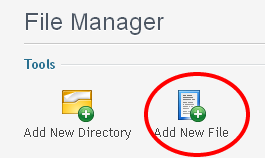
 Now, click Add New file, on the next screen, click upload the WordPress zipped files from the desktop and click OK. It will take few minutes to upload.
After that, select the zip file and click “Extract Files”. You will see a folder being extracted named “WordPress”.
Double click on the folder to go within it, select all the files and click on “Copy/Move”. You have to move all the files and folders out to the httpdocs folder. By default the path will show as “/httpdocs/WordPress/, but rename the path to /httpdocs.
If your domain is say www.example.com and if you would have kept the files within the WordPress folder, your site would be installed as www.example.com/WordPress.
As you have moved the files out to the httpdocs folder, the site will be installed as www.example.com.
Now, delete the zipped WordPress file and the WordPress folder from which you just moved out the files.
Now, rename the wp-config-sample.php file to wp-config.php.
 Click the icon above to open the wp-config.php file in an editor and replace the default database name, database user and password with the ones you just created in the above step. Click Save and then OK.
Now, open a new tab in your browser and type www.example.com/wp-admin/install.php and hit enter. Make sure to replace example.com with your own domain name.
You will get an installation form. Fill it with Site Title (you can change this later), enter a strong username and password, an email address and click “Install”.
Your WordPress has been installed!
As you can see, it’s almost the same as installing WordPress on cpanel with the only difference being the name of the folder. In cPanel, you called it public_html whereas in Plesk, you call it httpdocs.
The remaining steps are almost the same.
The interface of Plesk panel seems different from cPanel but almost as organized as Plesk.
Have you installed WordPress on Plesk Parallels before? How was your experience? Which do you think is better – cPanel or Plesk? Do share your experience in the comments below.
Personally I am not a fan of Plesk and if one has to pay for a control panel, its better to opt for cPanel or my personal favorite DirectAdmin !!
Installation is really simple with those having auto installers !!
But these are just one time process, a blogger would perform once a life time :))
Me too Hunky, not a fan of Plesk but as you know, the installation was for a client and so had a happy time sharing my experience.
Well written article… I will use your strategy on my blogs also. If you can deliver some suggestion then I will be very thankful. Thanks in advance
Glad to know that you’ll be taking action and applying the methods to your blog. You can subscribe to get more exclusive suggestions.
I sure think Cpanel is much easier than Plesk..
Thanks a lot for the guide! It was very helpful!
Glad to know that you found this helpful. Indeed I agree with you that cPanel is much easier than Plesk.
Great article and easy to follow!
Quick question:
Do you know if there is any reason why I might have trouble with the last step? I type the url (www.example.com/wp-admin/install.php) and exchange my site name, and I get an error like this: Parse error: syntax error, unexpected T_STRING, expecting T_OLD_FUNCTION or T_FUNCTION or T_VAR or ‘}’ in C:\Inetpub\vhosts\example.com\httpdocs\wp-includes\locale.php on line 21
My thoughts are that the installer file may have not gotten built correctly…Try and browse to that file and see if its works, if not then you may have to try and rebuild a new package.
Hi, did you manage to fix this problem? I seem to be having similar troubles..
Brilliant walk through, it has really helped me as a first time wordpress installer! I am, however, having problems with the last step. When I go to install.php I just get a plain white screen with no information at all. Do you have any ideas why this could be?
Sorry to hear that you are having problems in the last step.
Four things, or three depending on your host.
In config.php, check if the database name and password matches your created mysql database name and password.
If problem persists, try changing the memory_limit to 20MB.
Let me know if this works for you.
I ended up deleting everything I had uploaded and starting again. Not too sure why but this seemed to work fine and it is now working perfectly.
That’s good to hear Hannah. I think there had been some conflicts when it was uploading, that’s why the problem occurred.